
Combat in D&D 5e has five stages: determining surprise, establishing the environment (including all characters), tracking initiative, everyone taking their turn, and then moving to the next round. It looks like a lot when you have to call each stage by name, but trust me the steps flow into each other seamlessly with enough practice. If you are trying to DM D&D 5e’s combat for the first time or just need a refresher on the basics, this article is for you.
Taking Combat One Step at a Time
Step 1: Determine “Surprise”

This stage only matters if someone (players, NPC, or villains) is sneaking. If no one was attempting to be stealthy, skip right to the next step.
However, let’s say combat starts when a Goblin falls through the ceiling and stabs someone. In order to determine how this sequence of events plays out, the DM would compare the Goblin’s Stealth (Dexterity) check against the Passive Perception (Perception score + 10) of everyone participating in combat. If the Goblin’s Stealth check beats an individual’s Passive Perception, that individual is caught completely unaware and cannot take actions, reactions, or move on their first turn. If an individual’s Passive Perception is higher than the Goblin’s Stealth check, they are able to behave normally on their first turn of combat.
Remember! Any number of people can be Surprised within a group. Simply being in a group with a person who is not surprised does not negate your individual Surprise Condition.
This stage matters a ton to the Assassin subclass of Rogue who automatically scores a critical hit on a target that is surprised. If you have one of these at your table, always be ready for this step.
There are two other major considerations for this: the Alert player feat and level 7 Barbarians. Players who take the Alert are never surprised and will have high initiative as the other part of the feat. Level 7 Barbarians can act normally on their first turn even if they are surprised so long as the first thing they do is Rage.
Step 2: Render and Build the World/Establish Positions

This is probably the most straightforward of the steps: the players need to know what they are looking at. At this point, a map will need to be prepared and placed in front of your players so they can prepare themselves for their turn. Considerations for this include:
- where the players described themselves during roleplay and throughout the story
- the lighting of the location
- what might count for cover from attacks
- as well as any and all environmental hazards.
As the DM, your players should have a good idea of what the area around them looks like before a fight breaks out unless they are caught completely unaware in the dark. Be mindful that your description during roleplay has a strong correlation to the map. Any features of the room or things you made note of during the description should appear even if tables and chairs appear only as bad dry erase marker drawings.
If you are looking for a way to make your battle map come alive an easily populate a room with objects without being a dry erase master, you can buy these awesome static clings!

I have and use these regularly and they have become a staple in my DM arsenal. You can pick them up at your local game store or from our partner, Noble Knight Games!
Remember: where creatures stand also determines the possibility of an Attack of Opportunity, but more on that later.
Step 3: Who does what when: Roll Initiative!

Everyone will need to make a Dexterity check (also known as “rolling for Initiative”). For those lucky Bards, their Jack-of-all-Trades feature applies to this. The DM will then organize the Dexterity checks from highest to lowest, including both players and DM run creatures.
This is called the Initiative Order and it dictates when players take their turns. The highest initiative goes first, followed by the next highest, followed by the next highest and so on. When every person in the initiative has completed one turn, that Round is over and the combat resumes on the highest person’s initiative again. For the purpose of spells and other abilities that consider time, each round is considered to take six seconds.
When a DM runs identical creatures, a single initiative roll is made for all of them. Players decide their order amongst themselves if two players tie. The DM adjudicates ties between DM controlled creatures and ties between DM creatures and players.
In practice, I have found that calling for initiatives in groups of 5 helps a lot. If you don’t do this, you will likely end up with players screaming numbers at you. Which is overwhelming to say the least.
Start with, “Did anyone get an initiative above 20?” then “20 to 15,” and so forth until “5 to 1.” Tracking a lot of numbers can get confusing and this helps you build it in chunks, incorporating enemies around your player’s initiative.
To keep track of initiative you can use paper, apps, or physical trackers like this one available at Noble Knight Games:
Step 4: Take turns

Every player has a turn and the DM has as many turns as they have types of creatures. As previously discussed, the will follow the Initiative Order and their turns will be influenced by the turns made prior to theirs.
On the average turn, you can do all or none of the following:
|
Enemies go through the same process as players on their turns. An example of which would be “the Ogre draws his club and rushes the Fighter of the Party, furiously attacking and screaming insults about the Fighter’s mother.”
The Party can respond on their Initiative Turn. They may attack the Ogre, flee, or perform magic as long as it fits within their turn limitations.
Step 5: Repeat the last step: Begin the Next Round
All the pieces are in place now. All you have to do is let the turns on initiative play out. Unless more creatures arrive suddenly or the battle moves out of the established terrain, the battle will play out each round until its natural conclusion.
Some players like to negotiate their way out of a fight when they start to lose and some like to fight to the death. As always, be prepared to meet your party however they like to play.
Tracking Monster Hit Points
The DMG on pg. 248 recommends tracking hit points next to a monster’s name on a piece of paper. If you play on a map with miniatures or tokens, it’s easiest to have different minis or tokens for each creature to make tracking their hit points easier.
In a pinch, however, you can use stickers, colored paper clips, pipe cleaners or something else to help differentiate them. Be sure to give identical monsters some distinguishing traits so your players can reference them more easily.
Here is the tracking for the health of a Frost Giant and two Ogres he’s traveling with.
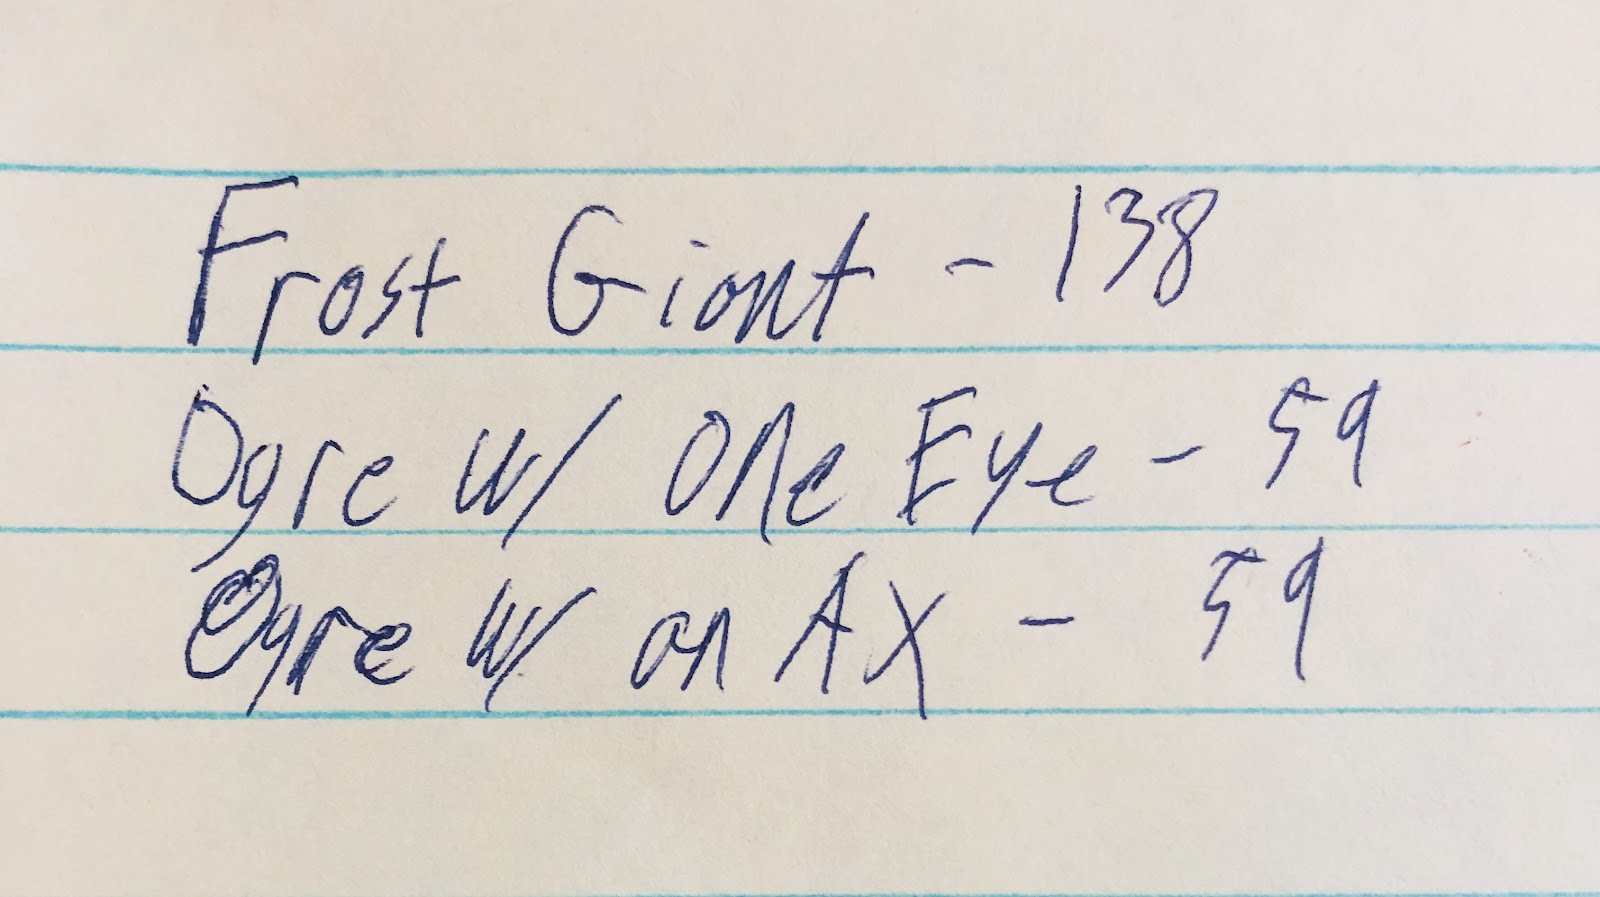
When they lose hit points, cross the original number out, and write the new total on the right. After a few rounds of combat, it can start looking longer and messier.

I generally prefer to track health and initiative together in a Google spreadsheet on my laptop during the games I DM. It makes it easier to order initiative automatically, track hit points, and label the creatures with conditions.
Total, Half and 3/4 Cover

In order to determine cover, choose the point-of-origin of the attack and the target of the attack. Find the closest corner of the attacker’s square and trace it with your finger to the edges of the target’s square(s).
If one or two of the lines is blocked, the target has half cover. This could be as simple as hiding behind a barrel with a bow. Half Cover gives a +2 bonus to AC and Dexterity Saving throws against attacks and effects that originate from the opposite side of the cover.
If three or four are blocked, the target has three quarter’s cover. This could be firing from an arrow slit in a castle wall. Three-Quarters Cover gives a +5 bonus to AC and Dexterity Saving throws against attacks and effects that originate from the opposite side of the cover.
If all four are blocked and the target is not visible in some way, this is Total Cover. This could be closing a steel door and locking it between the target and the attack. Targets in Total Cover cannot be targeted directly by an attack or spell.
Lighting

Lighting matters especially to creatures without Darkvision. It sets up ambushes and creates an ambiance for your players to interact with as well as limiting their options. It’s a double-edged sword though. Players with Darkvision can absolutely attack villains without Darkvision for a sweet ambush edge. Here are the basics of lighting you need to know.
Bright Light allows every creature to operate normally. This can be the result of a sunny day or close proximity to a lit torch.
Dim Light is usually a mass of shadows. It’s usually the boundary between Bright Light and Darkness. This would be encountered on the edges of the torchlight, twilight, dawn, or a particularly bright full moon in the middle of the night. Creatures with Darkvision see as if this is Bright Light. Those without Darkvision see everything as Lightly Obscured and only shades of gray.
Lightly Obscured: Perception checks using sight to detect anything that is Lightly Obscured has Disadvantage on the roll.
Darkness is found in the middle of the night in the woods, a lightless cave, or a dark alleyway with no street lights. Those with Darkvision now suffer from everything being Lightly Obscured and only shades of gray. Any creature without Darkvision now sees a Heavily Obscured area.
Heavily Obscured: Creatures are Blinded which means they automatically fail Perception checks involving sight. Attacks they attempt are at Disadvantage and attacks against them have Advantage.
Flanking
This is an optional rule that the DM can offer. If two allied creatures stand on opposite sides of an enemy, they gain Advantage on melee attack rolls against that target. Both allies must be able to see the target and not be incapacitated.
General Tips
Structure of an encounter
Whenever you are structuring an encounter, be mindful of how many encounters your players have been through and if there will be any more encounters after. If they are starting an encounter having used none of their spells, abilities, scrolls, or any other resources you can put them against some steep odds in good conscience.
If this is the players’ third combat encounter in a day and it is still gauged to be deadly, consider what might happen if the dice rolls are bad and prepare for the party to attempt to escape or negotiate.
Martials vs Spell Casters

Much has been made over the debate of Martials and Spellcasters in D&D, but here specifically I want to remind every DM to build encounters with your player’s classes in mind.
Magic Resistance gives enemies Advantage on saving throws against spells and weakens spellcasters. High AC makes a target harder to hit and weakens martial classes. Keep these traits and others in mind as you design encounters that way every member of your party gets the opportunity to shine.
The most actions (usually) win
Action Economy is a term you can find in almost any tabletop forum online. It refers to the tendency in D&D, and other turn-based games, for the side with the most actions to win unless the power of those two sides is wildly unbalanced.
In order for one giant monster to threaten a group of five adventurers, the monster will have to attack several times and have a lot of health. This is why higher-level creatures have Legendary Actions that they may take when it is not their turn. It ensures a higher chance of success against more rolls.
If you want to learn more about legendary actions and how to use them as a DM, be sure to check out my article all about that here.
Other variations on this include auras around monsters that negatively impact adventurers and some monsters have features that allow them to summon other monsters to help them.
Duration of each turn in real-time
In my experience, when everyone is focused and using abilities they are familiar with, the average turn takes about two minutes. This includes targeting, dice rolls, and explaining the consequences of the turn.
I’m aware of two major exceptions to this anecdotal rule. One is when a spell affects multiple different targets and involves several saving throws. The other is when the players have to change plans mid-fight and strategize their movements.
Neither is a bad thing. In fact, I’d say that’s part of the fun. Just watch that every player is allowed the same amount of time and is respecting other players’ time.
Don’t forget the Attacks of Opportunity!
When a creature decides to leave a hostile creature’s melee attack range, the hostile creature is allowed to make an attack before the creature leaves.
Don’t forget this!
I’ve played for several years and I still occasionally get hit with one I wasn’t considering. It helps shape the encounter and encourages a careful approach in both getting into melee combat and getting out of it.
There you are DM, you are now prepared to run an awesome combat encounter! If you need help building an encounter, you can head on over to my “Creating Balanced Encounters” post and if you want specific tips on running combat in an Urban space, you can find that right here.
Until next time my friends,
May your game have advantage!
-Halfling Hannah

Support Halfling Hobbies by Treating Yourself to Something from the Tinket Shop!

- Is Curse of Strahd Low Magic?
 Curse of Strahd is a low-magic, high-fantasy setting. This is because the commodity of magic within Strahd’s domain of Barovia is scarce and the magic that once existed is either
 - Complete Guide to Illusion Magic in D&D
 The School of Illusion is a school of magic that specializes in deceit. Like the School of Enchantment, illusion spells focus on altering the perceptions of others to achieve your goals. This can be as innocent as creating an image in a 5 foot cube to as wicked as harnessing the nightmares of your enemies to drive them into madness.
 - Can Strahd Von Zarovich be Killed? D&D 5e
 No. Strahd Von Zarovich, the Vampire villian of the D&D adventure module starting back in AD&D, cannot be completely destroyed. Because he is the ruler of a Domain of Dread, if “killed” Strahd will regenerate within his Domain anywhere from a few days to months later.
 - Using Werewolves in D&D
 So if you’ve got a player asking to be a lycanthrope or want to include a Big Bad Evil Pupper in your campaign, but you’re not sure where to start, this article is for you. We’re going to explore several ways that you can incorporate werewolves into your campaign.
 - The Best Resources for Epic D&D Adventures
 To create an epic D&D Adventure, be it a one-shot, campaign or side quest, you will need the following resources: